The solution I used my Gmail account to send and receive email from my local SharePoint server via hMailServer, it is a free e-mail server for Microsoft Windows. It’s used by Internet service providers, companies, governments, schools and enthusiasts in all parts of the world.
It supports the common e-mail protocols (IMAP, SMTP and POP3) and can easily be integrated with many existing web mail systems. It has flexible score-based spam protection and can attach to your virus scanner to scan all incoming and outgoing email.
The benefits are:
– There is all free and not required for licenses fee
– Fast and and easy to setup
– Gmail is available and have good performance and security
In this post, I just introduce SMTP to send mail and let you try on POP3 and IMAP ;)
OK, Here we go
Firstly, we can download hMailServer from website, I also uploaded current lasted version to Mediafire
After finished download, run hMailServer-5.3.3.exe file, click Next to continue the installation wizard

If your local machine has database instant, click Next to continue the installation wizard, or you can use SQL Compact if don’t have database engine installation.

Click Next on next screen.

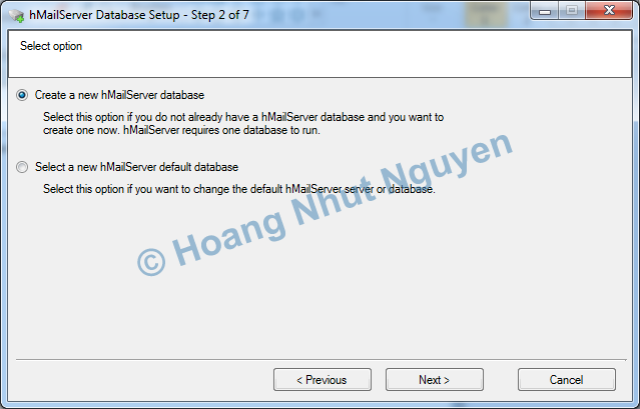
On next screen, select Create a new hMailServer database for the first installation
Select your database server type
Input your database server connection information as below
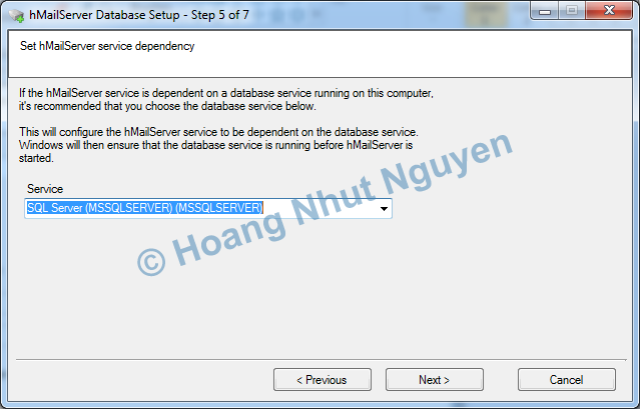
On next screen, select database service to ensure database service is running before hMailServer service is started

Click Close to finish the wizard

After finished the wizard, it prompts for password to be able manage hMailServer configuraiton

Check Run hMailServer Administrator and click Finish to continue configuration

On Conect screen, check on Automatically connect on start-up and click Connect

From left menu, navigate to SMTP, fill your host name to Local host name textbox and SMTP Relayer information. In this step, you have to provide your email account and password to login to Gmail

On RFC compliance, check as below

Navigate Auto-ban and uncheck Enabled if you don’t use Auto-ban feature

Navigate to My computer under IP ranges, fill your local IP address or keep 127.0.0.1 in Lower IP and Upper IP. Make sure all check box as below

And same to Internet range

Finally, you should disable Firewall service to make sure you have no problems with connection issues

Next step, Login your SharePoint Central Administration. Go to System Settings and select Configure outgoing e-mail settings under E-Mail and Text Messages (SMS) section

Fill Mail settings with your hMailServer information and email address use to send email

To test send mail function, you can open any your web application and go to Site Permissions. Try to add a user and check on Send welcome e-mai to the new users as below

Finally, open mail box of this user and check result
It’s cool!!!
Source: https://nhutcmos.wordpress.com/2011/10/18/use-google-mail-as-sharepoint-outgoing-e-mail/
It supports the common e-mail protocols (IMAP, SMTP and POP3) and can easily be integrated with many existing web mail systems. It has flexible score-based spam protection and can attach to your virus scanner to scan all incoming and outgoing email.
The benefits are:
– There is all free and not required for licenses fee
– Fast and and easy to setup
– Gmail is available and have good performance and security
In this post, I just introduce SMTP to send mail and let you try on POP3 and IMAP ;)
OK, Here we go
Firstly, we can download hMailServer from website, I also uploaded current lasted version to Mediafire
After finished download, run hMailServer-5.3.3.exe file, click Next to continue the installation wizard

If your local machine has database instant, click Next to continue the installation wizard, or you can use SQL Compact if don’t have database engine installation.

Click Next on next screen.

On next screen, select Create a new hMailServer database for the first installation

Select your database server type

Input your database server connection information as below

On next screen, select database service to ensure database service is running before hMailServer service is started

Click Close to finish the wizard

After finished the wizard, it prompts for password to be able manage hMailServer configuraiton

Check Run hMailServer Administrator and click Finish to continue configuration

On Conect screen, check on Automatically connect on start-up and click Connect

From left menu, navigate to SMTP, fill your host name to Local host name textbox and SMTP Relayer information. In this step, you have to provide your email account and password to login to Gmail

On RFC compliance, check as below

Navigate Auto-ban and uncheck Enabled if you don’t use Auto-ban feature

Navigate to My computer under IP ranges, fill your local IP address or keep 127.0.0.1 in Lower IP and Upper IP. Make sure all check box as below

And same to Internet range

Finally, you should disable Firewall service to make sure you have no problems with connection issues

Next step, Login your SharePoint Central Administration. Go to System Settings and select Configure outgoing e-mail settings under E-Mail and Text Messages (SMS) section

Fill Mail settings with your hMailServer information and email address use to send email

To test send mail function, you can open any your web application and go to Site Permissions. Try to add a user and check on Send welcome e-mai to the new users as below

Finally, open mail box of this user and check result
It’s cool!!!
Source: https://nhutcmos.wordpress.com/2011/10/18/use-google-mail-as-sharepoint-outgoing-e-mail/

No comments:
Post a Comment